You are here: 1. Distribution System > 1.3. FILE Menu: Master File Maintenance > 1.3.14. File - Debtors Contract Pricing > Adding a New Debtor Contract

Adding a New Debtor Contract

To create debtor contracts:

  1. Open the Debtors Contract File Update screen.

Refer to "Opening the Debtors Contract Pricing Master File".

  1. Select FILE | NEW.

Micronet displays the Debtors Contract File Update screen in Add Mode.

  1. Complete the following fields:


Field

Value


Contract Number

Enter a unique ID for the debtor’s contract, e.g. JUNE. If the contract applies to a specific debtor, you could also include the debtor ID in this number.


Description

Enter a description for the debtor’s contract, e.g. June Promotion.


Track Sales

Select Yes if you want Micronet to track contract sales, or No if you don't. If you select Yes, Micronet stores the contract number details within the invoice history file for referencing via reports and inquiries.


Contract Selection

Select how you want Micronet to apply the contract pricing. Options are:

  • Contracts Only – select this option if you always want Micronet to use the contract price for contract customers during sales invoicing, regardless of the price
  • Standard Price if Less Expensive – select this option if you want Micronet to apply the standard price for contract customers if it is less expensive than the contract price.


Restrict Sales

Select No Restrictions if the contract pricing can be used for any order entry type (invoice, slip, quote or batched invoice). Select Batched Invoices Only if you only want the Quick Entry order entry function to allow operators to store/process the order as a batch. This option is handy when you have customers with a large product range in the contract file and you want to prevent inadvertent direct invoices being created that may need to be reversed by credit note.


Contract Type

Select the type of contract you are creating. Options are:

  • Regular Contract – the contract applies to a range of customers and territories
  • Promotion – this option is reserved for Micronet Online Ordering (MOO), Micronet ECOM and Data.Connect. Use it to set up a contract to store customer promotional items (specials). When customers assigned to this contract log onto MOO/ECOM, there will be a Promotions button on the navigation bar where the user can select to view the items in the contract – see "Promotions" in the Micronet ECOM manual. The Favourites button will also have a small down arrow which the user can select to view the items in the contract – see "Favourites" in the Micronet ECOM manual.
  • Customer Exclusive – the items on this contract can only be sold to the debtors to whom this contract is assigned
  • Territory Exclusive – the items on this contract can only be sold in the sales territories to which this contract is assigned
  • Order Template – save this contract as an order template that can be used to speed up data entry when creating invoices
  • Web Exclusive – the items on this contract can only be sold to the debtors to whom this contract is assigned and who are flagged for Web Exclusive contracts (see notes below). Note that this contract type only applies to orders created within Micronet ECOM; it does not apply to orders created in Micronet.


Technical Tip

For Customer Exclusive and Territory Exclusive contract types, the items must be in a product category that is flagged for exclusive contracts.

For more information, see "File - Product Category - Category".


Technical Tip

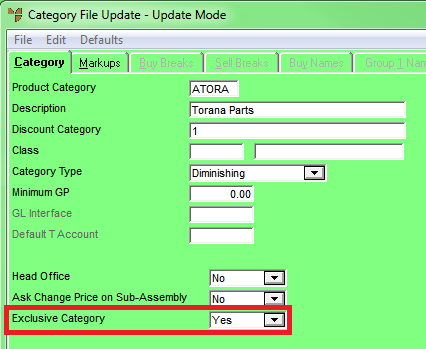
For Web Exclusive contracts, you need to set up a user defined question on the Debtor Master file for Apply Web Exclusive Contracts and set this to Yes for the debtors you want to restrict items for. Debtors who are flagged for Web Exclusive contracts will only be able to see the items on debtor contracts that are assigned to them and which have a Contract Type of Web Exclusive. They will also only be able to see product categories that have items in them.

If a debtor is not flagged for web exclusive contracts, they will see all items as normal.

You will need to let Micronet know which UDQ you have used so Micronet ECOM can be configured to use that UDQ.


Technical Tip

For Web Exclusive contracts, the note above describes a way to limit the products debtors can see by selecting a list of included products. An alternative option is to set up a list of excluded products, which might be quicker and easier. For information on this method, see "Can we hide products from debtors?" in the Micronet ECOM manual.


Expiry Date

If this contract has an expiry date, enter or select the date. Leave this field blank if there is no expiry date (i.e. an open contract).


Exclude from Loyalties

2.8 Feature

Select whether items sold using this contract should attract customer loyalty credits. The options are:

  • Yes – exclude any items sold under this contract from loyalty credit calculations
  • No – include any items sold under this contract in loyalty credit calculations.

For more information about customer loyalty credits, refer to "Debtors Transaction Processing - Rebates Menu (v2.7)".


Technical Tip

If this field is set to exclude contract items from loyalty credit calculations, it overrides the setting in the Exclude from Contracts field on the Loyalty tab of the Debtor master file (refer to "File - Debtor - Loyalty (v2.8)").


Head office Maintained

Select Yes if this contract can only be maintained in head office, or No if it can be maintained in branches as well.

If a contract is Head Office maintained, store users cannot edit the contract at all. If they try to add or edit an item on the contract, or add or change the contract assignments, the following message is displayed:


Delete at End of Month

Select Yes if this contract is to be deleted during End of Month processing, or No if it is to be retained after EOM.

  1. Add the items to be included in this contract, along with their contract prices or discounts.

Refer to "Maintaining Items Included on the Contract".

  1. Alternatively, automatically create the contract items based on a customer's sales history.

Refer to "Edit - Auto Create".

  1. Assign the contract to the appropriate customers.

Refer to "Edit - Current Assignments" or "Edit - Assign Contract".


Warning

If your company uses SalesLink/Opmetrix to receive customer orders into Micronet, make sure you read the topic "Creating Debtor Contracts for SalesLink / Opmetrix" before assigning the contract to customers.

  1. Select FILE | SAVE.

If you changed the contract Expiry Date on the Debtors Contract File Update screen, Micronet displays a message asking if you want to update all contract assignments to the new expiry date.

  1. If you want to update the Ending Date on all assignments for this contract to the new expiry date, select the Yes button. Otherwise, select the No button.

If you select No, Micronet saves the contract without updating the contract assignment end dates.

If you select Yes, Micronet saves the contract and updates all applicable contract assignment end dates to the new expiry date.